In one of our recent posts, we talked about about how Kohler has introduced their advanced Nightlight toilet with automated LEDs. Suffice it to say, toilet designs are evolving at a progressive pace, and it might be high time for you to get rid of your ole leaky water closet. However, just buying a new toilet doesn’t solve the problem; you still have to install the entire setup.

Fortunately, as it turns out, installing a brand new toilet is not at all a difficult endeavor, once you get past the weight factor.
More importantly, the bevy of contemporary water closet models boast of quite a few structural as well as ergonomic credentials for the perfect ‘toilet experience’.
But before we delve into the actual DIY process itself, we would like to share a few relevant points that a potential DIYer should go through –
1) When removing your old toilet, always make sure to disconnect it from the water supply pipe.
2) Enlist the help of other people, especially when carrying and positioning the toilet base. Also, wearing rubber gloves makes it easier to grip, while conveniently keeping your hands clean.
3) Some localized plumbing codes might make it illegal to just change a crucial bathroom fixture. So, make sure your local bye-laws allow you to go through with the process.

Finally, we come to the procedure on how to replace a toilet, which we will divide into two parts. The first part will deal with removing your old toilet, and the second part will entail installing the new one. The tools required of the whole process includes – a big screwdriver, plastic scraper, hacksaw, adjustable wrench and rubber gloves (optional).
How to remove your old toilet –
Step 1 –

As we mentioned before, you should first switch off the water supply to the toilet by rotating the supply valve (underneath or at the side of the tank). Additionally, you should also dispose off the water from the tank by flushing it completely.
Remaining water can be removed by a plunger or by using mopping sponge.
And, to disconnect the water supply pipe to the tank you will have to open the tank lid, and reach out for the connector (usually located at one corner). You can unfasten this connector with a wrench.
Step 2 –
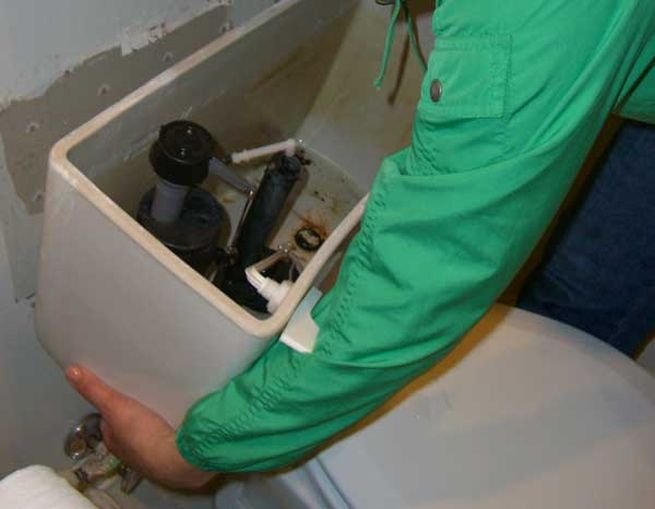
Now it’s time to completely remove the tank from the toilet bowl. Once again, you need to access the bottom panel of the tank, and gently remove the bolts. An easy process entails – firmly clasping the nuts on the outside of the tank with pliers (which can be done by a second person), and then ‘unscrewing’ the bolts from inside.
Step 3 –
Finally, it is time to disassemble the entire toilet bowl from the wax seal connecting it to the bathroom floor. In an ideal scenario, you can use a wrench to release the bolts. However, common occurrences dictate otherwise where the bolts get tight and rusty due to the solidified layer of previously applied putty. During such scenarios, you can use a scraper to loosen up the old caulk. And, if this doesn’t work, you have opt for more extreme methods, like using a hacksaw to cut off the bolts.
Then make sure to remove any water in the bowl by utilizing a plunger or a sponge mop.
Now use both of your hands to grab the toilet and try to rock it in a side-to-side motion. The wax seal should break off eventually, thus allowing you detach the entire toilet from the floor.
Tips – After the toilet has been removed completely, use a rag or balled cloth to block the open drainpipe (also known as soil pipe). This prevents the sewer gases from escaping into your bathroom. Also try to remove any trace of the old putty around the drain pipe’s circumference and old flange. This makes it easier to install the new toilet.
How to install your new toilet –
Step 1 –
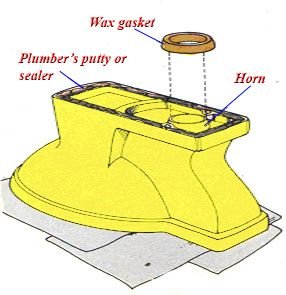
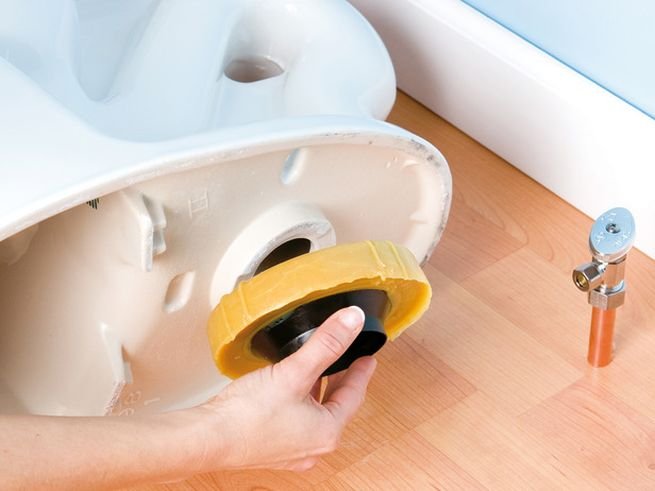
Enlist a second person’s help, and put your new toilet bowl upside down on a padded surface or a soft cloth covered hard floor. This gives you access to the whole bottom facade of the toilet. Now apply plumber’s putty around this section, so as to endow a watertight passage when the bowl is connected to the drain pipe.
Step 2 –

Then you should fix the wax ring (seal) on the circumference of the base horn (the toilet bowl’s hole that connects to the drain pipe). Make sure to press it firmly so that it sticks to the circumference without any gap.
Step 3 –
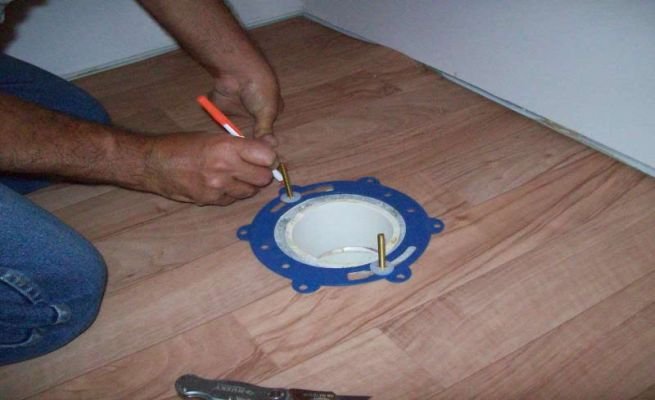
Now come back to the open drain pipe, and remove the old flange. Put new bolts into the base and tighten them in their respective positions with the help of putty. Finally, put a new closet flange in place, and screw it to the floor (around the drain pipe).
Then remove the rag that you had previously kept to block the pipe opening.
Step 4 –

Once again, enlist another person’s help to gradually lift the upside down toilet bowl. Carefully place it over the newly fixed flange, so that the protruding bolts are adjusted and aligned to the base of the bowl. Then proceed on to affix the bolts with nuts and metal washers. And, do take care to tighten the nuts in a gentle manner, without creating too much stress on the toilet (which can cause cracks).
Tips – Before tightening the nuts, you should make sure the toilet is firmly placed in position and is leveled with the bathroom floor. For the apt positioning, you can always sit on the toilet (with care) or press it down with your hands, thus sealing the wax ring. As for the leveling process, keep a level across the seat while putting wood shims beneath the base. You can tighten the screws with this setup, and keep an eye on the overall level of the toilet.
Step 5 –

After the toilet bowl is comfortably placed, leveled and fixed to the ground level (or rather around one-eight inch above ground level, due to the wax seal), it is time to attach the new tank to the toilet. You should proceed by placing the tank on its side, and then inserting the bolts and washers inside it. Lastly, place the spud washer over the inlet connecting the tank and the bowl.
Now grab the tank with your hands and position it correctly atop the aligned bolt holes and the spud washer. Tighten the bolts gently, and voila; your tank is securely fixed to the toilet bowl.
Step 6 –

Finally, we come to the last step of installing a new toilet, and this entails – simply connecting the water supply pipe to the tank. Once you have joined the pipe, open the supply valve (by rotating it in the other direction) and let water fill up the tank. Proceed on to flush for a few times just to check for any leakage or bad installation pattern. And, then attach the toilet seat to the newly installed setup.
Tip – When inserting the water supply pipe into the tank, you can always wrap a Teflon layer around the pipe’s threads, thus reducing the chance of leaks. And, you can further opt for caulking around the base of the bowl, where it connects to the floor.


