Earlier, we talked about how plastic containers can be used to create a whole ‘city’ of doll houses. Well, fortunately for the more resourceful among us, the innovative scope doesn’t stop at doll houses. Empty plastic bottles can be also used for a multitude of other household designs, with their practicality coming in handy for both outdoors and indoors. More importantly, such ‘DIY’ contrivances can save you money while also making your neighborhood’s landfill a environmentally friendlier place.
1. Herb Planters

We start off our list with an outdoor gardening application. Recycled plastic bottles can actually be used as a self-watering planter for herbs. All you need to do is cut a 2-liter label removed bottle (all the way around) at a proximity of 5-inches from its base. Now, with the cap still intact in its position, you should invert the top part of the bottle and place in inside the base. It is then time to fill the top with soil, and then planting a seedling (it should be secure by pressing the soil). Finally, you can take out the top portion (now filled with soil) from the base and remove the cap. The self-watering planter is ready; for each time, you just need to add some water to the base for nourishment of the seedling, until the plant is well watered.
2. Plastic Flower Pots

Another garden accessory, and this time the DIY scope is a bit easier. You should have a clean plastic bottle for this simple contrivance. You can cut this bottle from the middle part and completely remove the top half with the cap. The lower half of the bottle now acts as a pot for a variety of small flowering plants; all you need to do is insert the plant into this bottle base. For a more effective design, you can also wrap the ‘pot’ in cloth and then tie it with a rope line. This measure not only enhances the aesthetic appeal of the plastic pot but the cloth also acts as a safe cover for the transparent bottle.
3. Backyard Bird Feeder

Yes, beyond gardening items, we can also use plastic bottles for feeding our avian friends. For this design, you would again need a clean plastic bottle. Now, you make an 1/2-inch (or 1/4-inch) mark around 4-inches from the base. Turn the bottle 180 degrees, and make a second 1-inch mark (on the opposite side the original mark), this time with a circle. Repeat the same process for two other marks, around 2-inches from the base, and make sure the linearity of these marks are at 90 degrees to the above marks. Finally, make holes along these marks (preferably with a craft knife) and insert spoons. You can then fill up the bottle with bird seeds, while the birds themselves use the spoons as ‘landing pads’.
4. Making a funnel

From outdoor applications we now shift our focus to kitchen based items. In this regard, we can use a plastic bottle for those nifty kitchen funnels. The process entails cutting up your plastic bottle into two pieces, and then utilizing the top part with the cap (which actually has a funnel-like shape). For the next step, you need to make a slanted mark inside the top part of the cut bottle (can be done with a CD marker). Finally, you should cut along this line and voila – a fully usable funnel is born. The slanted nature of this item also makes it easier to scoop stuff like rice and flour.
5. Candy Dishes

Our previous entry dealt with the utilization of the top part of the plastic bottles. This doesn’t necessarily mean that we would nonchalantly throw the bottom part into our trash can. In fact, we can make further use of this plastic bottle bottom to make candy dishes. The simple process requires us to make a line mark around the bottle (its height depending upon the depth you would want in your DIY dish). Then you can cut out this part and the plastic dish is roughly ready. You can further opt for embellishments like punching holes around the top part of this ‘dish’ and then weaving ribbons in and out of the holes (while the bottle’s default chromatic hue already gives a lovely composition to the design).
6. Making our own cutlery

Check out the top right hand corner of the above image, and you would get a clear idea of how to make a whole plastic spoon out of a discarded bottle. The only requirement here is to make a deft and delicate cut along the marked line that encompasses a bottom section of the bottle. You can also make colorful spoons instead of a transparent one by choosing different tinted plastic bottles.
7. Recycled Packaging for Baked Items

Perfect for keeping and displaying your delectable cup cakes and cookies, this upcycling process requires you to cut the bottom part of your bottle at your preferred height. Then you need trace a circle on a cardboard equivalent to the circumference of the bottle’s cross-section, and cut it out accordingly. Now, place your baked item on this circular cardboard piece, and cover it up with the inverted bottle bottom (which was previously cut). Finally, wrap a Washi tape (or a double sided tape) around the base covering both the bottle and the cardboard, and thus – a dandy recycled package is born!
8. Seal up food Items
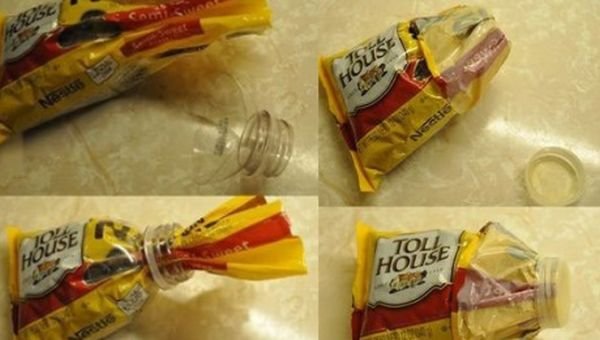
By far the most simple tip in this post, plastic bottles (and preferably jars) can be just used as easy storage mechanisms for your food items that come in plastic bags. All you need to do is roll up the bag and insert it inside the bottle (as shown in the above image). Sealing your bottle’s cap does the rest of the job by keeping your food air-tight and safe.
9. Pen Stands for your desk
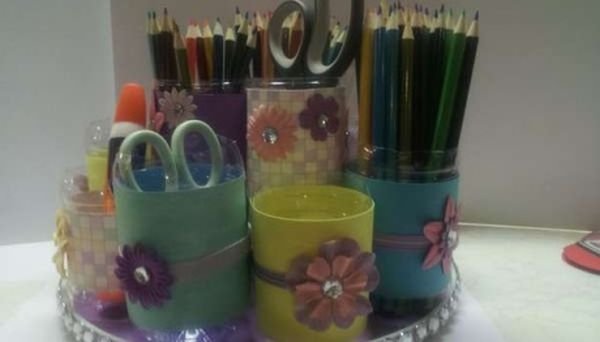
Now coming to the realm of decor, reused plastic bottles can make their utility felt in your desks and study table. How so? Well, you can once again cut up a bottle into two, and then use the bottom part with the base as a simple pen stand. And, in case you are worried that your guests would laugh at your effort, you can always go for a bit of embellishment. For this you need to glue up the outer surface of the bottle and wrap various colors of marble paper or art paper for bringing the vibrant effect back to your desk.
10. Homemade Mosquito Trap

Finally we come to our last entry, and this one serves a practical purpose, especially for tropical countries. We are talking about a homemade mosquito trap that can be made by cutting up a plastic bottle (a bit higher than the mid level). Then you need to insert the top part (now cone shaped) in an inverted manner into the bottom part, and glue them together by using adhesive or silicon. Now, you need to make a separate thick solution with one table spoon of yeast and 1/2 cup of sugar added to warm water. Once you pour the mixture into the bottle, the yeast reacts with sugar to give off carbon dioxide. And, it is this emitted carbon dioxide that guides the mosquitoes to the glued bottle trap.